Garmin Tech Support

Adding Data Fields From Garmin Connect IQ

If you didn’t know it already, Garmin has a market place of sorts where you can find cool things to add to your Garmin device. It is called Connect IQ. I had a comment on another post yesterday asking about how you add a data field from Connect IQ to your device. So here you go!

  1. In the Garmin Connect Mobile app on your smart phone find the Connect IQ Store selection in the more menu.

img_3442

2. Search the store for the field you may like. There are many options for searching. Make sure you are searching for a field that is compatible with your device.

img_3431

3 & 4. Select the data field you want and download it. You should get a notification after it is downloaded that it will be available on your device after you sync the watch.

img_3433

5. Sync your device.

6. Navigate to the Activity Settings for the desired activity (I am doing running).

7. Use the arrows to select the Data Screens.

8. For this example we need the layout set to one field for this screen.

9. Click down one time to choose the field. The trick here is that the fields are listed with like fields (HR, Pace, Power, etc…). You should find a selection for Connect IQ.

img_3443.png

10. Select the correct field and then get out of the settings by using the back button.

11. Navigate through the screens while in the activity and you should see the new field!

img_3444.png


There are some really cool things available in Connect IQ. My favorite thing is choosing a new watch face!

If you have any other questions or functionality you need help with please let me know!

How to set HR and Power Zones for Garmin Devices

Below are the instructions for setting HR or power zones for a Garmin 735. This method should work more almost all newer Garmins. Essentiall you will set the zones in Garmin Connect on the web and the next time you sync your device it should update with the proper zones details. This is what is used when you set you up custom workouts using Garmin Connect.

Login to your Garmin Connect account online.  From the main menu on the left select Devices.

Screen Shot 2016-12-20 at 4.10.05 PM.png

Select the device you want to set the zones for if you have more than one device attached to your account. After you have selected the device, click on the User Settings tab.

Screen Shot 2016-12-20 at 4.10.32 PM.png

In here you will find the screens to set both your HR zones or power zones.

HR can be set by entering in your MAX HR if you know it and allowing Garmin to figure out your zones from there. Or you can manually set the zones.

Power works much the same. If you know your FTP you can enter it and let Garmin do the rest. That is what I do.Screen Shot 2016-12-20 at 4.11.30 PM.png

Make sure to scroll to the bottom and save your updates. Next time you sync your device with Garmin Connect your zones should update!

Garmin Forerunner – Setting up data screens

With awesome features comes slightly difficult set up sometimes. You would think that setting up your data screens for your Garmin Forerunner would be easy, but it can be a challenge. I will give you instructions on setting a data screen for a Forerunner 230 (my current running watch). This may not match your watch exactly but it might get you close enough to figure it out!

IMG_8986.JPG

  1. Select the Menu for the Activity you are setting up your screens for.
  2. Use the runner button to select and the lap arrow button to go back. Choose Activity  Settings.
  3. Use the up and down arrows to choose the Data Screens items.
  4. Select which screen you would like to modify. (the number of screens you can modify will be based on which watch you have)IMG_8984.JPG
  5. Select the Layout (how may fields you display).
  6. Use the up and down arrows on the left to toggle between the choices. You will see the layout change. Use the runner button to select the layout you want.
  7. Next select Field 1 to choose what data it will display
  8. The field types are in categories; Distance, Pace, Speed, Heart Rate, Cadence, Temperature, Elevation, and other. Choose the filed you want.IMG_8987.JPG
  9. Repeat for the next field.
  10. Select the type of field.
  11. Select the field you want.
  12. SUCCESS!

Setting Up Alerts on a Garmin Device

Did you know that you know you can set up a variety of alerts on your Garmin? I have used this mostly as a time based alert to remind me to eat. You can use the alerts to monitor your pace, heart rate, distance, and even a run/walk interval. The directions below are based off my Garmin 230 Forerunner watch but it should be similar for other Garmins.

To access the Alerts on the watch follow this path.

Menu–>
Activity Settings–>
Alerts–>

If you haven’t set any up the next choice you will see is “Add New”. Choose the type of alert you want to create; custom, heart rate, run/walk, pace, time, distance, or calories.

Custom has some cool choices like drink, eat, turnaround, go home, or you can even make a custom custom one!

After you have created your alert (based on whatever you need your watch to alert you about) you must turn it on for that activity. To do this follow this path.

Menu–>
Activity Settings–>
Alerts –>
Find the Alert you created and make sure the status is “On”

Be prepared to be alerted!

Creating a Custom Workout with Garmin Connect

One of the most useful functions of a Garmin device is the ability to create custom workouts that the watch can guide you through. Not all Garmins have this capability so you should review the specs of your device to see if your device supports this. I have used this function with a 910, 920, and 230. You can create a workout on the device directly but I have found that using Garmin Connect online makes it MUCH easier.

In Garmin Connect, open the Workouts menu item.

Screen Shot 2015-12-29 at 1.17.56 PM.png

From there you will want to create a new workout. You can choose the type of workout. I mostly make run workouts but I have made a bike one.

Screen Shot 2015-12-29 at 1.18.16 PM.png

Once in the new workout, you can choose the type of interval, the duration of the interval (I often use Lap Button Press for my warm up and cool downs just so I can start and stop the workout when I am ready), you can add more steps, or add repeats (much easier than adding them over and over again)

Screen Shot 2015-12-29 at 1.18.38 PM.png

I have added a set of repeats that will be 6 X 0.25 miles with 2:00 min rest. If you select the “Add More…” function you can specify a goal pace or HR zone for the interval. Be sure to name your workout.

Screen Shot 2015-12-29 at 1.20.05 PM.png

When you are done you must SAVE the workout and then you can send it to a device.

Screen Shot 2015-12-29 at 1.20.40 PM.png

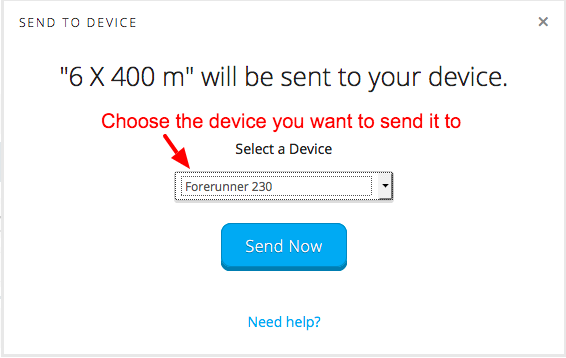
If you have more than one device you must choose which device to send it to.

Screen Shot 2015-12-29 at 1.21.02 PM.png

Next time your device syncs, it SHOULD pick up the new workout. This can be a bit clunky at times. You may have better luck sending it to your device through your phone if you use Garmin Connect Mobile. Give yourself some time to play with this step.

Once it has synced to your device you should be able to find it in a Training menu under Workouts. This will vary by device as well. Once you locate the workout you just have to start it! If your last interval called for pressing the lap button to end it, be sure to do that to hear your finishing music!

Happy training!